Developer Guide
- Acknowledgements
- Setting up, getting started
- Design
- Implementation
- Documentation, logging, testing, configuration, dev-ops
- Appendix: Requirements
- Appendix: Instructions for manual testing
- Effort
Acknowledgements
- JavaFX for providing the API to render GUI.
- Jackson for providing the API to parse JSON files.
- JUnit5 for providing a unit testing framework.
- WedFast is built using the features from AB3.
Setting up, getting started
Refer to the guide Setting up and getting started.
Design
.puml files used to create diagrams in this document can be found in the diagrams folder. Refer to the PlantUML Tutorial at se-edu/guides to learn how to create and edit diagrams.
Architecture

The Architecture Diagram given above explains the high-level design of the App.
Given below is a quick overview of main components and how they interact with each other.
Main components of the architecture
Main has two classes called Main and MainApp. It is responsible for,
- At app launch: Initializes the components in the correct sequence, and connects them up with each other.
- At shut down: Shuts down the components and invokes cleanup methods where necessary.
Commons represents a collection of classes used by multiple other components.
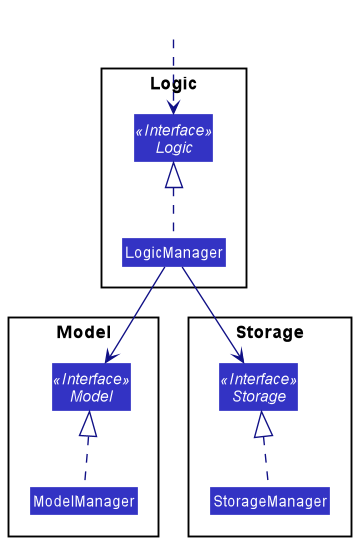
The rest of the App consists of four components.
-
UI: The UI of the App. -
Logic: The command executor. -
Model: Holds the data of the App in memory. -
Storage: Reads data from, and writes data to, the hard disk.
How the architecture components interact with each other
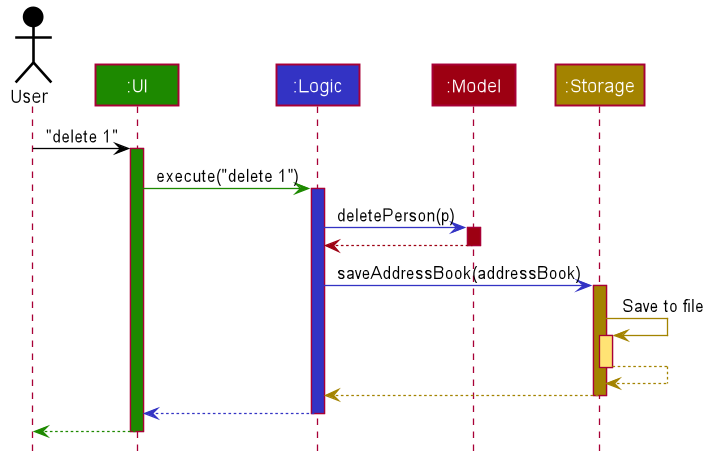
The Sequence Diagram below shows how the components interact with each other for the scenario where the user issues the command delete 1.
Each of the four main components (also shown in the diagram above),
- defines its API in an
interfacewith the same name as the Component. - implements its functionality using a concrete
{Component Name}Managerclass (which follows the corresponding APIinterfacementioned in the previous point.
For example, the Logic component defines its API in the Logic.java interface and implements its functionality using the LogicManager.java class which follows the Logic interface. Other components interact with a given component through its interface rather than the concrete class (reason: to prevent outside component’s being coupled to the implementation of a component), as illustrated in the (partial) class diagram below.
The sections below give more details of each component.
UI component
The API of this component is specified in Ui.java
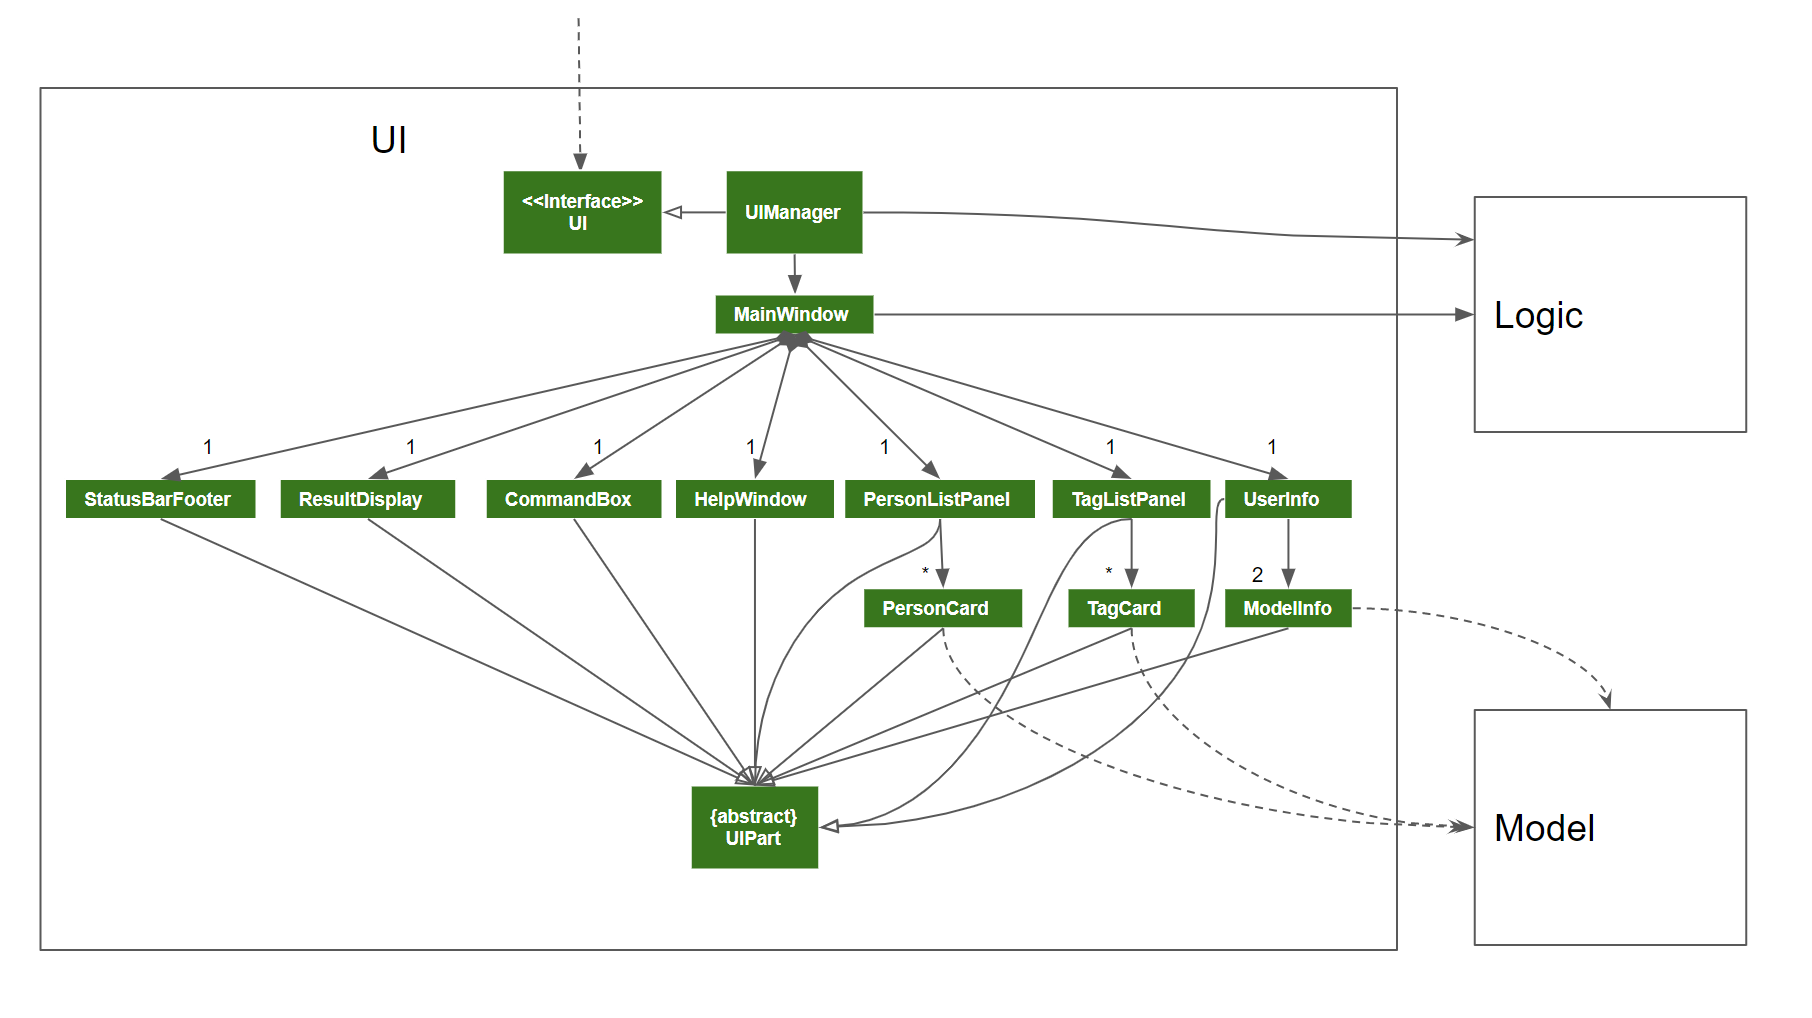
The UI consists of a MainWindow that is made up of parts e.g.CommandBox, ResultDisplay, PersonListPanel, StatusBarFooter etc. All these, including the MainWindow, inherit from the abstract UiPart class which captures the commonalities between classes that represent parts of the visible GUI.
The UI component uses the JavaFx UI framework. The layout of these UI parts are defined in matching .fxml files that are in the src/main/resources/view folder. For example, the layout of the MainWindow is specified in MainWindow.fxml
The UI component,
- executes user commands using the
Logiccomponent. - listens for changes to
Modeldata so that the UI can be updated with the modified data. - keeps a reference to the
Logiccomponent, because theUIrelies on theLogicto execute commands. - depends on some classes in the
Modelcomponent, as it displaysPersonobject residing in theModel.
Logic component
API : Logic.java
Here’s a (partial) class diagram of the Logic component:
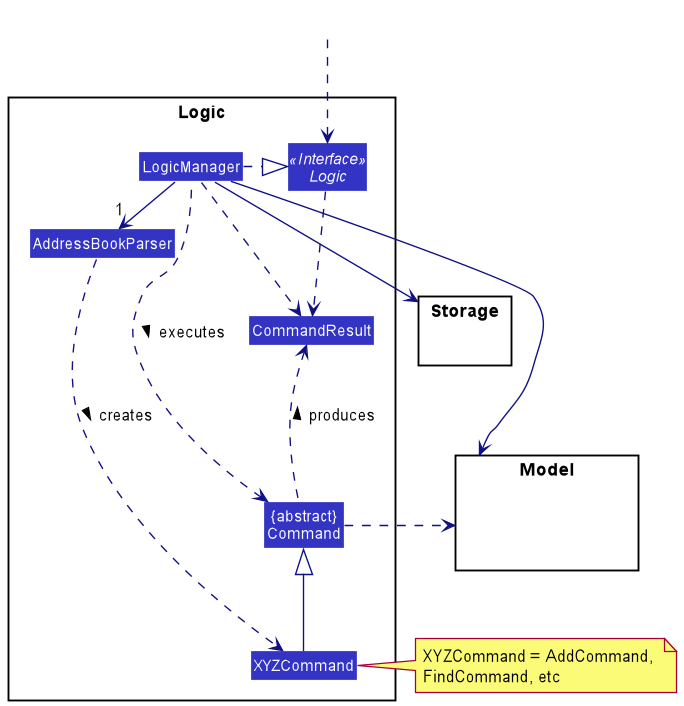
How the Logic component works:
- When
Logicis called upon to execute a command, it uses theAddressBookParserclass to parse the user command. - This results in a
Commandobject (more precisely, an object of one of its subclasses e.g.,AddCommand) which is executed by theLogicManager. - The command can communicate with the
Modelwhen it is executed (e.g. to add a person). - The result of the command execution is encapsulated as a
CommandResultobject which is returned back fromLogic.
The Sequence Diagram below illustrates the interactions within the Logic component for the execute("delete 1") API call.

DeleteCommandParser should end at the destroy marker (X) but due to a limitation of PlantUML, the lifeline reaches the end of diagram.
Here are the other classes in Logic (omitted from the class diagram above) that are used for parsing a user command:

How the parsing works:
- When called upon to parse a user command, the
AddressBookParserclass creates anXYZCommandParser(XYZis a placeholder for the specific command name e.g.,AddCommandParser) which uses the other classes shown above to parse the user command and create aXYZCommandobject (e.g.,AddCommand) which theAddressBookParserreturns back as aCommandobject. - All
XYZCommandParserclasses (e.g.,AddCommandParser,DeleteCommandParser, …) inherit from theParserinterface so that they can be treated similarly where possible e.g, during testing.
Model component
API : Model.java

The Model component,
- stores the address book data i.e., all
Personobjects (which are contained in aUniquePersonListobject). - stores the currently ‘selected’
Personobjects (e.g., results of a search query) as a separate filtered list which is exposed to outsiders as an unmodifiableObservableList<Person>that can be ‘observed’ e.g. the UI can be bound to this list so that the UI automatically updates when the data in the list change. - stores the countdown data i.e., a
Countdownobject. - stores the shortcut data that contains the shortcuts user has saved.
- stores a
UserPrefobject that represents the user’s preferences. This is exposed to the outside as aReadOnlyUserPrefobjects. - does not depend on any of the other three components (as the
Modelrepresents data entities of the domain, they should make sense on their own without depending on other components)
Tag list in the AddressBook, which Person references. This allows AddressBook to only require one Tag object per unique tag, instead of each Person needing their own Tag objects.
Storage component
API : Storage.java
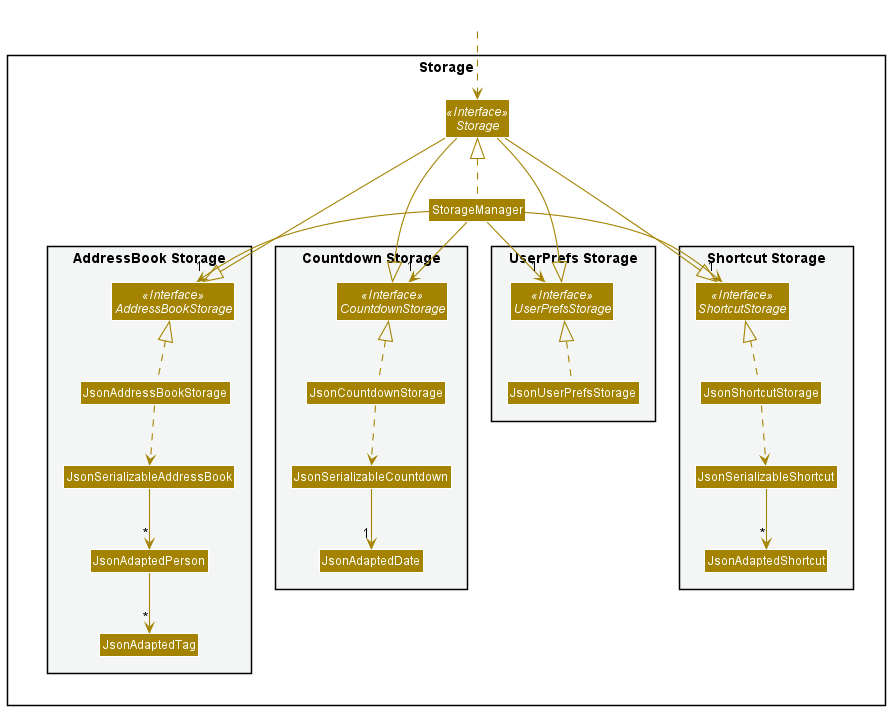
The Storage component,
- can save both address book data, user preference data, countdown data, and shortcut data in json format, and read them back into corresponding objects.
- inherits from both
AddressBookStorage,UserPrefStorage,CountdownStorage, andShortcutStoragewhich means it can be treated as either of them (if only the functionality of only one is needed). - can save address book data, countdown data, shortcut data, and user preference data in json format, and read them back into corresponding objects.
- depends on some classes in the
Modelcomponent (because theStoragecomponent’s job is to save/retrieve objects that belong to theModel)
Common classes
Classes used by multiple components are in the seedu.addressbook.commons package.
Implementation
This section describes some noteworthy details on how certain features are implemented.
Find by Tag and Price feature
Implementation
Finding by Tag and Price is a combinatory feature implemented by Predicates. The predicate for tags is TagContainsKeywordsPredicate.
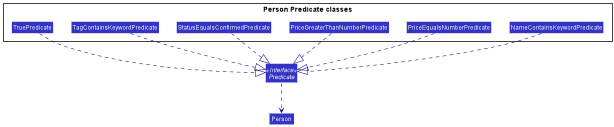
Finding by price range uses three different predicates.
-
PriceEqualsNumberPredicatefor to find equal to price -
PriceGreaterThanNumberPredicatefor to find greater than certain price -
PriceLessThanNumberPredicatefor to find less than certain price
The 5 operators =, <, >, >=, <= are implemented using the above predicates.
| Operator | Predicate |
|---|---|
| = | PriceEqualsNumberPredicate |
| > | PriceGreaterThanNumberPredicate |
| < | PriceLessThanNumberPredicate |
| >= | PriceEqualsNumberPredicate \|\| PriceGreaterThanNumberPredicate |
| <= | PriceEqualsNumberPredicate \|\| PriceLessThanNumberPredicate |
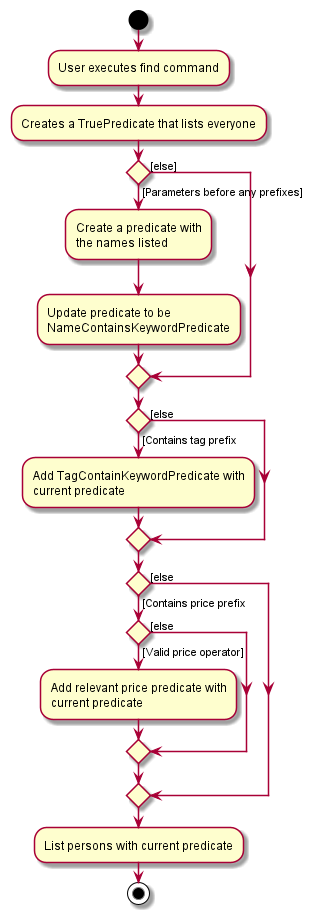
The following activity diagram summarizes what happens when a user executes a find command:
Design considerations:
Aspect: How each predicate is combined together:
-
Alternative 1 (current choice): Queried list of contacts must fit all three criterias at once.
- Pros: It is likely user would use this feature more as it narrows the scope of the query
- Cons: Some users may misinterpret the functionality and be confused
-
Alternative 2: Queried list of contacts can fit any of the three criterias
- Pros: Consistent with how multiple names work with the
find [NAMES]function - Cons: Less likely to be used as additional parameters won’t increase effectiveness of query.
- Pros: Consistent with how multiple names work with the
Shortcut features
Implementation
The shortcut implementation is facilitated by a Shortcut module with four commands: sc, addsc, removesc, and listsc. Each responsible for the call shortcut, add shortcut, remove shortcut, and list shortcut functions respectively.
Shortcut mechanism is similar to AddressBook but instead stores a HashMap<String, String> of shortcuts corresponding to its key and commandString. To store it in JSON, JsonShortcutStorage use JsonSerializableShortcut to read and write from the JSON file. The storage architecture can be seen in the diagram above.
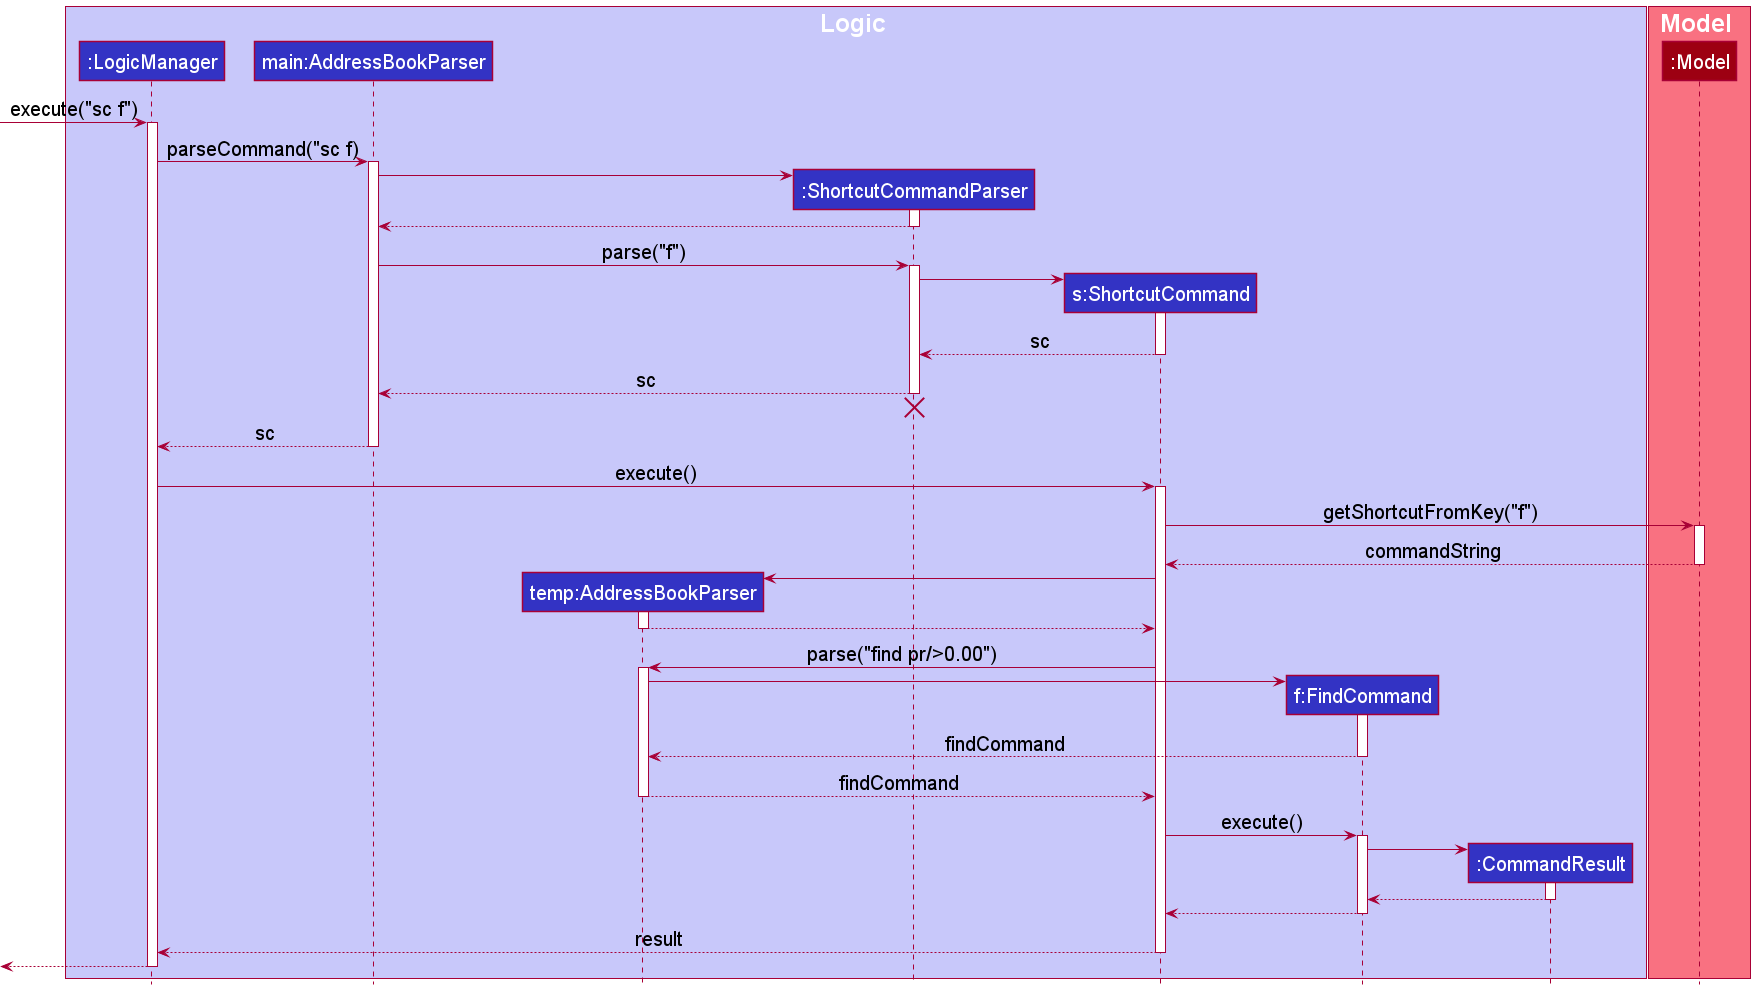
Given below is an example usage scenario and how the shortcut mechanisms behaves at each step.
Step 1. The user launches the applicatio nand has the following person list saved. Shortcut stores this in the shortcutMap.
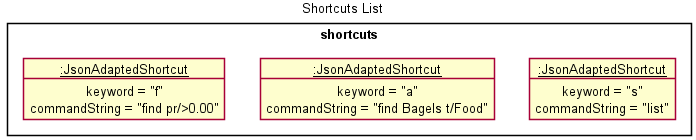
Step 2. The user executes sc f to call the shortcut f leading to the command find pr/>0.00 to be called. The sc command first calls Model#getShortcutFromKey() to obtain the command from the model.
Step 3. The sc command takes this new command and parses it in the AddressBookParser. If this succeeds command in the commandString is executed on the same model.
Below is a simplified sequence diagram showing how a ShortcutCommand would interact with the logic component. The interactions of the FindCommand stored in the commandString is simpified as the main focus of this diagram is the shortcut functionality.
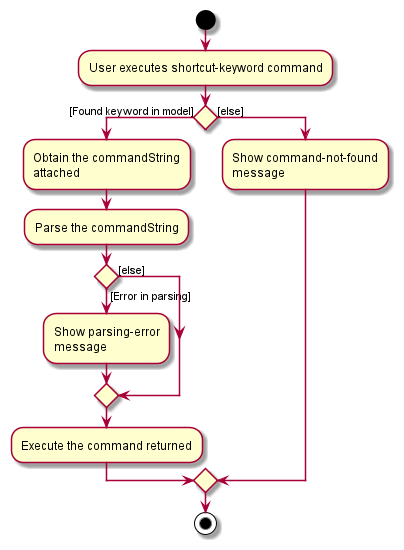
The following activity diagram summarizes what happens when a user executes a shortcut-keyword command:
Design considerations:
Aspect: When to check if shortcut command is valid:
-
Alternative 1 (current choice): Check when it is called by
sc- Pros: Less intensive on the system. User can still check if command is correct by eye using
listsc - Cons: User needs to make sure they add the correct command themselves
- Pros: Less intensive on the system. User can still check if command is correct by eye using
-
Alternative 2: Check when it is added by
addsc- Pros: User can avoid the case where they add an invalid command
- Cons: Bug Prone. Commands may have runtime errors depending on the state of the
AddressBook(Unable to tell if command is invalid).
Delete by name feature
Implementation
The delete-by-name mechanism is facilitated by AddressBook. It implements ReadOnlyAddressBook with a person list, stored internally as an persons. Additionally, it implements the following operation:
-
AddressBook#removePerson()— Removes specified person from its person list.
The operation is exposed in the Model interface as Model#deletePerson().
Given below is an example usage scenario and how the delete-by-name mechanism behaves at each step.
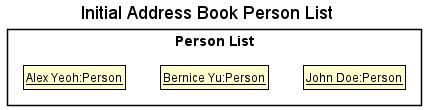
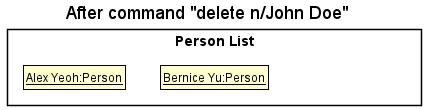
Step 1. The user launches the application and has the following person list saved. AddressBook stores these contacts as persons.
Step 2. The user executes delete n/John Doe command to delete the person named John Doe in the list.
The delete command first calls Model#updateFilteredPersonList() and Model#getFilteredPersonList() to get a list where all the persons in the list named John Doe.
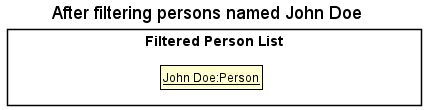
Step 3. With the access to the filtered list, it calls Model#deletePerson(), causing AddressBook to remove each person in the
list by calling AddressBook#removePerson(). Finally, the user will see the updated person list with John Doe removed.
Model#deletePerson(), so the AddressBook person list will not be modified.
The following sequence diagram shows how the delete-by-name operation works:
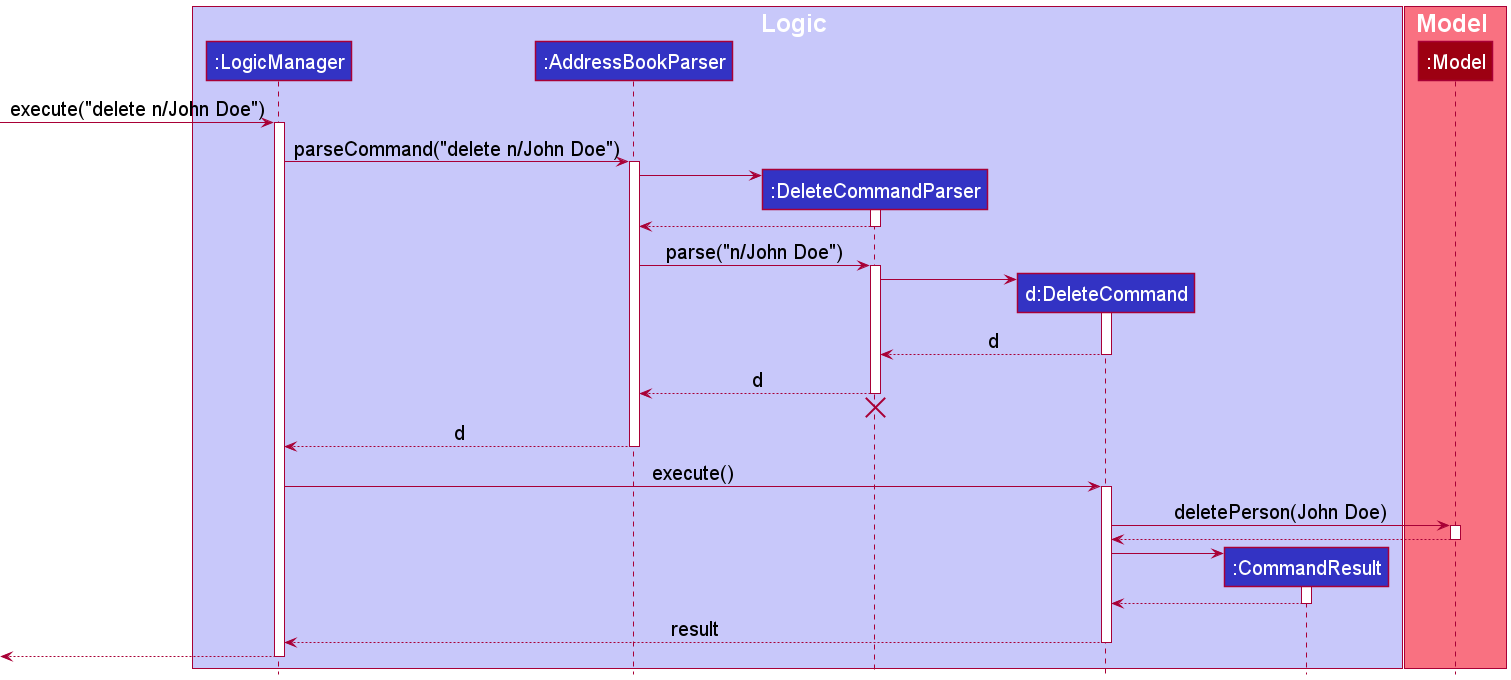
DeleteCommandParser should end at the destroy marker (X) but due to a limitation of PlantUML, the lifeline reaches the end of diagram.
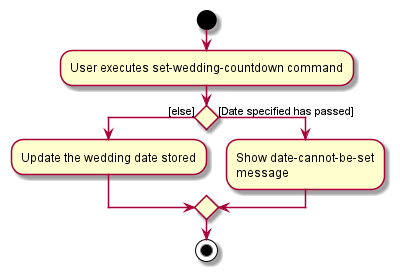
The following activity diagram summarizes what happens when a user executes a set-wedding-countdown command:
Design considerations:
Aspect: How delete-by-name executes:
-
Alternative 1 (current choice): Deletes the person with the exact same name.
- Pros: Avoid the situation where user deletes the wrong person
- Cons: User needs to remember the name precisely.
-
Alternative 2: Deletes the person who names partially contains the specified name.
- Pros: User does not have to remember the full name (e.g.
delete n/Alexwill delete both person named Alex Tan and Alex Yeoh). - Cons: Might delete the wrong person.
- Pros: User does not have to remember the full name (e.g.
Countdown to the wedding day feature
Implementation
The countdown mechanism is facilitated by Countdown. It implements ReadOnlyCountdown with a wedding date, stored internally as weddingDate. Additionally, it implements the following operation:
-
Countdown#setData()— Replaces the existing wedding date with a new date. -
Countdown#getDate()— Returns an unmodifiable view of the wedding date.
The operation is exposed in the Model interface as Model#setDate() and Model#getWeddingDate().
Given below is an example usage scenario and how the countdown mechanism behaves at each step.
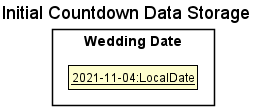
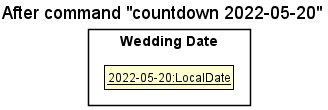
Step 1. The user launches the application and never set wedding date before. Countdown automatically stores today’s date as weddingDate. Say today is 4 November 2021.
Step 2. The user executes countdown 2022-05-20 command to set his/her wedding date to 20 May 2022.
The countdown command then calls Model#setDate() to set the wedding date to 20 May 2022.
Step 3. With this updated wedding date, the user executes countdown (without argument) command to see the number of
days left until his/her wedding above the command box.

Step 4. The user can also view the countdown at the right top corner of the app immediately after updating the wedding date.

Model#setDate(), so the Countdown wedding date will not be modified.
The following sequence diagram shows how the set-wedding-date-for-countdown operation works:
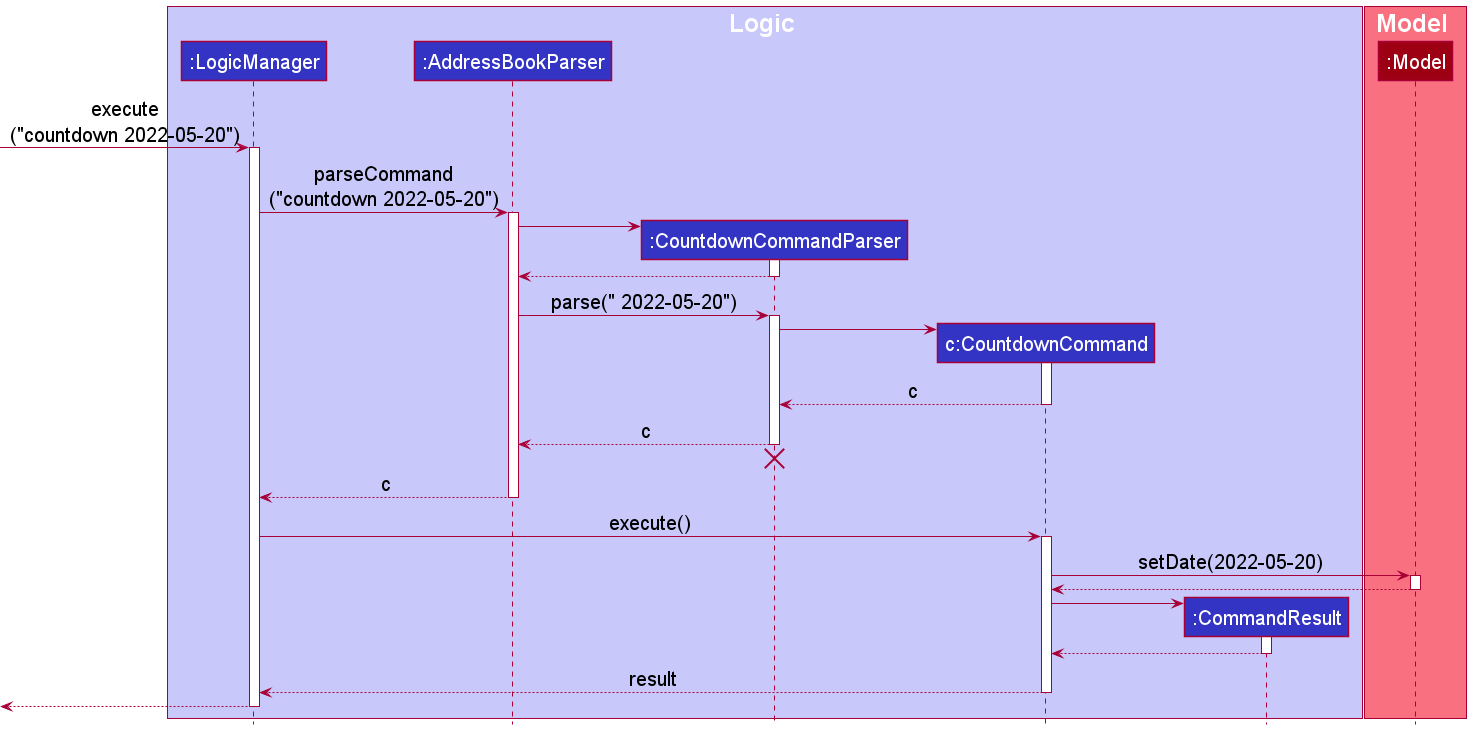
CountdownCommandParser should end at the destroy marker (X) but due to a limitation of PlantUML, the lifeline reaches the end of diagram.
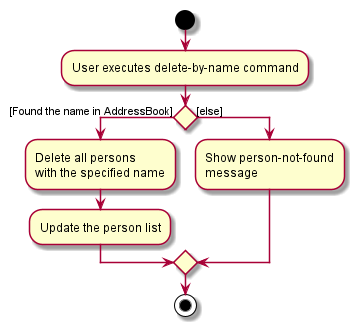
The following activity diagram summarizes what happens when a user executes a delete-by-name command:
Design considerations:
Aspect: How setting wedding date for countdown executes:
-
Alternative 1 (current choice): Does not allow setting past date as wedding date.
- Pros: Fit for the purpose of the app: planning for future wedding.
- Cons: Cannot track how many days has passed since the wedding.
-
Alternative 2: Allow setting past date as wedding date.
- Pros: Can track how many days has passed since the wedding.
- Cons: Does not fit for the purpose of the app: planning for future wedding.
Cost sum checking feature
Implementation
The cost sum checking mechanism is facilitated by Model. It implements the following operation:
-
Model#updateFilteredPersonList()— Filters the person list with specified condition(s).
Given below is an example usage scenario and how the cost sum checking mechanism behaves at each step.
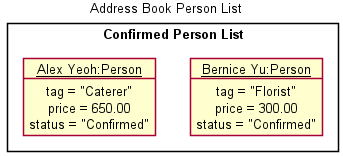
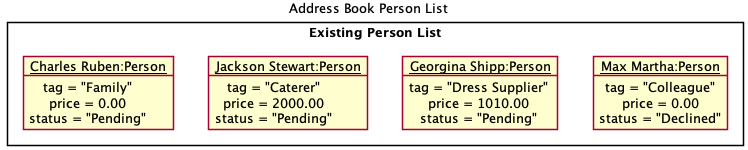
Step 1. The user launches the application and wants to check the total expenses for certain categories. Let say he/she has the following contacts stored.
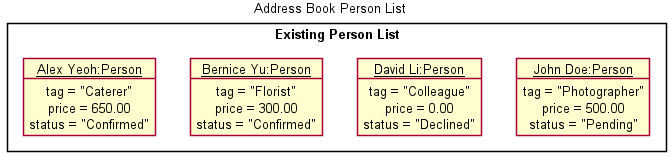
A contact’s
status indicates whether the user has confirmed to hire this person/ the user is sure that this person will
attend his/her wedding. Therefore, based on the diagram above, the user has confirmed to hire Bernice Yu as his/her
florist with the cost of 300.00 dollars.
Step 2. The user executes price t/Florist Photographer command to check the expenses under Florist and Photographer
category. The price command first calls Model#updateFilteredPersonList() to get all the contacts with confirmed
status.
Step 3. With this filtered list, price command then further filters out person(s) with either Florist or Photographer
tags. Then, it calculates the total sum of price for each contact(s) in this filtered list.
Step 4. Finally, the user can view the calculation result right above the command box.

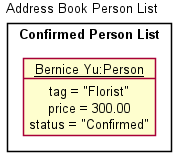
Step 4. The user then checks the total cost of his/her wedding by executing price command (without any argument). Hence,
price command will just sum up all the price for all the contacts with confirmed status. The only contacts with
confirmed status are Alex Yeoh and Bernice Yu, respectively hired by the user with the cost 650.00 dollars and
300.00 dollars. Hence, the total is 950.00 dollars.

The following sequence diagram shows how the cost-sum-checking operation works:
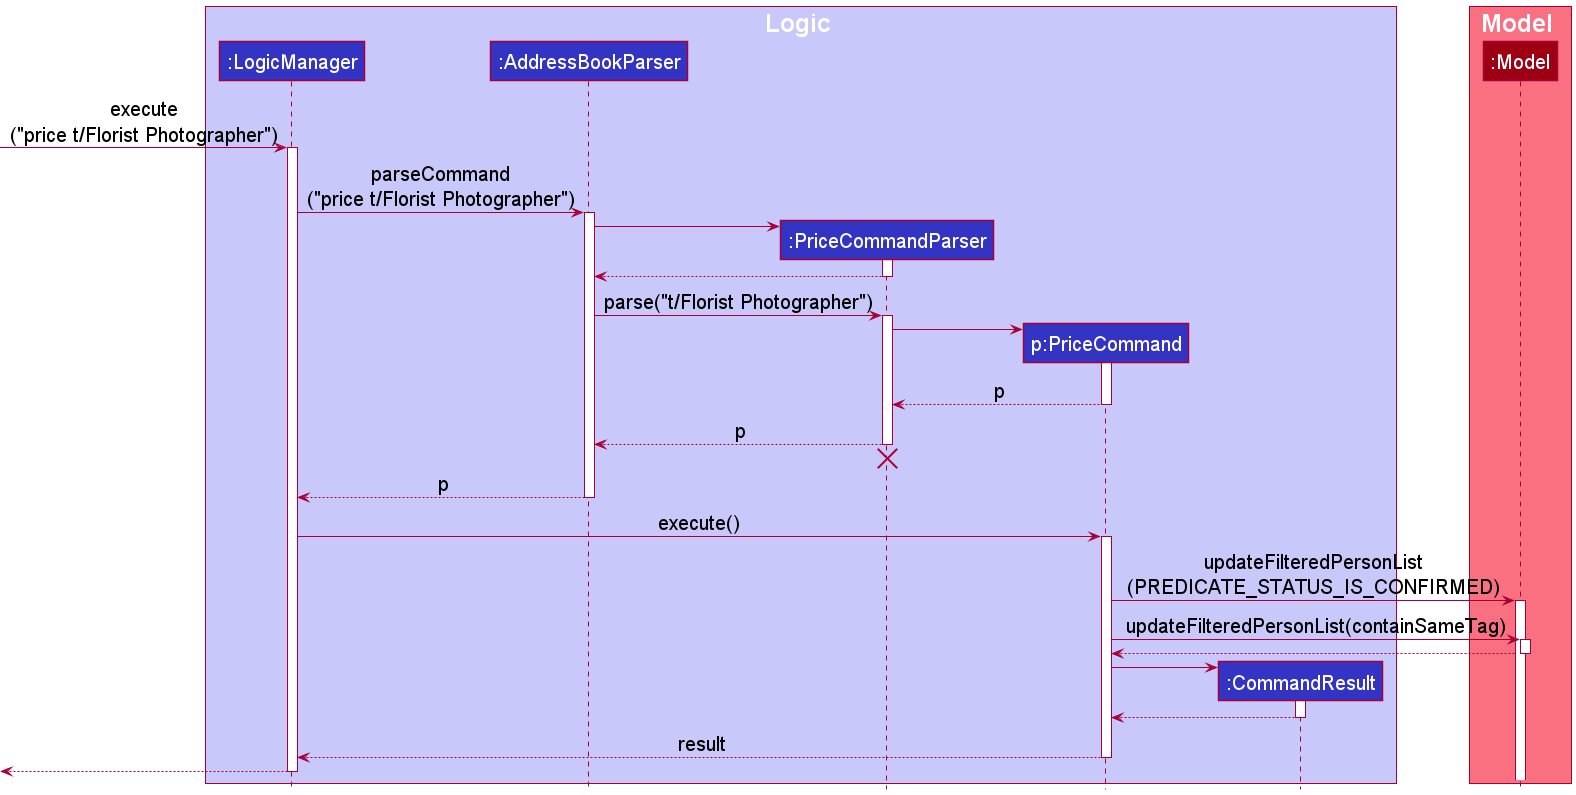
PriceCommandParser should end at the destroy marker (X) but due to a limitation of PlantUML, the lifeline reaches the end of diagram.
Design considerations:
Aspect: How cost-sum-checking operation executes:
-
Alternative 1 (current choice): Does not calculate the cost for those who has not confirmed yet.
- Pros: Gives an exact number on those categories the user confirms to spend money on.
- Cons: The total sum does not include the potential expenses, i.e. cost for persons with
pendingstatus.
-
Alternative 2: Calculate the cost for those who has not confirmed yet.
- Pros: The total sum includes the potential expenses, i.e. cost for persons with
pendingstatus. - Cons: Does not give an exact number on those categories the user confirms to spend money on.
- Pros: The total sum includes the potential expenses, i.e. cost for persons with
Delete by tag feature
Implementation
The delete by tag mechanism is facilitated by AddressBook, which implements ReadOnlyAddressBook.
Additionally, it implements the following operation:
-
AddressBook#removePerson()— Removes specified person from list ofpersonsin address book
This operation is exposed in the Model interface as Model#deletePerson().
Given below is an example usage scenario and how the delete by tag mechanism behaves at each step.
Step 1. The user launches the application for the first time. The AddressBook will be initialized with the list of
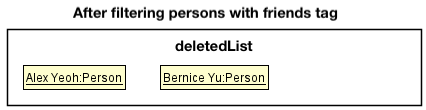
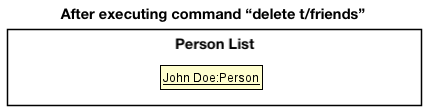
persons consisting of all contacts (image adapted from Delete-by-name section).
Step 2. The user executes delete t/friends command to delete contacts consisting of the friends tag. The delete command first calls
Model#getFilteredPersonList() and then iterates through the given list to filter out person objects that have the friends tag. While doing so, relevant
person objects are placed into a separate list known as deletedList. Assuming that Alex Yeoh and Bernice Yu are the only contacts with the friends tag,
the deletedList is updated as follows.
Step 3. The delete command then fully iterates through deletedList, and calls Model#deletePerson() at each iteration to remove
every person identified as part of the deletedList from the AddressBook.
Step 4. Once the contacts have been successfully deleted, a command result indicating that contacts under friends tag has been removed is reproduced in the command box.

AddressBook,
then the delete command throws an error message that specifies that contacts with such a tag do not exist in the AddressBook.
The following sequence diagram shows how the delete by tag operation works:

Delete by Tag should end at the destroy marker (X) but due to a limitation of PlantUML, the lifeline reaches the end of diagram.
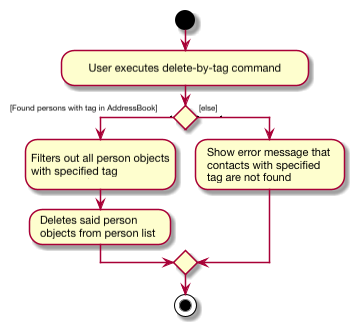
The following activity diagram summarizes what happens when a user executes a new delete by tag command:
Design considerations:
Aspect: How delete by tag executes:
-
Alternative 1 (current choice): Deletes all contacts under a specific tag.
- Pros: Easy to implement.
- Cons: May be inconvenient for users who wish to delete selected range of contacts (e.g. delete pending contacts under friends).
-
Alternative 2: Deletes selected contacts under a specific tag.
- Pros: Increases ease of deleting multiple contacts with different statuses for user
- Cons: Difficult to implement, and could potentially add confusion with an increase in syntax required to differentiate various functions for delete.
Report feature (status)
Implementation
The following details on implementation only cover the information on how the status count across different tags is computed within the report. Implementation details regarding expenditure calculations and overall contact status count are left out.
The report mechanism is used to generate a report with the summarized statuses(and prices) across different tags.
It is facilitated by Model. Additionally, it implements the following operation:
-
Model#getFilteredPersonList()— Provides list ofpersonsin address book based on the predicate provided
Given below is an example usage scenario and how the report behaves at each step.
Step 1. The user launches the application for the first time. The AddressBook will be initialized with the list of
persons consisting of all contacts (image adapted from Delete-by-name section).
Step 2. The user executes report command to view the status (and expenditure) across all tags. The report command calls
Model#getFilteredPersonList() and then iterates through the given list to filter out tags and check the respective status count for each tag (i.e. number of confirmed, pending and declined contacts associated with each tag).
While doing so, each tag and the status count associated with it is stored within a reportElement which is placed and regularly updated in a separate arraylist known as reportArray.
Assuming that the following is the details for the contacts stored,
- Alex Yeoh: Tag is friends and status is pending
- Bernice Yu: Tag is friends and status is confirmed
- John Doe: Tag is caterer and status is declined
the diagram below would be expected.

Step 3. The report command then fully iterates through the reportArray, and produces a text report of the different tags identified
as well as their respective status counts (in the form of a popup window).

Step 4. After that, a command result indicating that the report window is opened is reproduced in the command box.

Design considerations:
Aspect: How report executes:
-
Alternative 1 (current choice): Produces status for tags and expenditure in a text form.
- Pros: Easy to understand and implement the report.
- Cons: May be inconvenient for users to read through the entire report when the number of tags and contacts is very high.
-
Alternative 2: Produces graphical representation of report
- Pros: Enables user to better visualise status of different tags
- Cons: Could be difficult to interpret graph if user uses a large range of tags with various statuses.
Undo feature
The undo mechanism is facilitated by an Undo module and is prompted by the command undo. This command
is used for undoing the most recent change made to the program.
It uses the ReadOnlyAddressBook interface to retrieve the list of people stored as contacts.
The undo mechanism invokes the following operations:
-
AddressBook#removePerson()— Removes the specific person from the list of people. -
AddressBook#setPerson()— Adds the specific person to the list of people.
The above operations are represented by the Model interface in the UndoCommand class as Model#deletePerson() and
Model#setPerson() respectively.
To undo a task, the undo class keeps track of what the previous command is through the method Undo#setPreviousCommand,
and when the undo command is inputted, it checks what the previous command (static variable prevCommand)) was and
whether it can be undone.
As of now, the undo command will revert the action of an add, edit, delete, clear or group command. Other
commands cannot be undone (due to their nature) or have not been implemented.
Given below is an example usage scenario and how the undo mechanism behaves at each step.
Step 1. The user launches the application for the first time. The AddressBook person list is shown below.
The prevCommand variable is set to nothing, as no previous command has been made.
Step 2. The user executes edit 1 s/Confirmed command to change the status of the first person in the book to confirmed.
The edit command called will invoke Model#setPerson() to make the changes to the AddressBook person list.
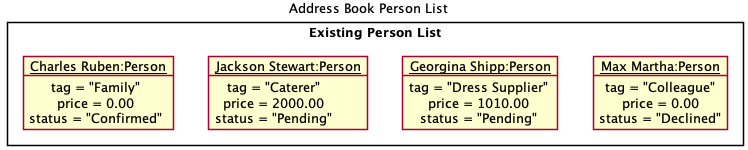
The prevCommand variable will now be assigned to this EditCommand object.
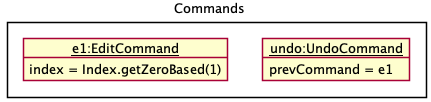
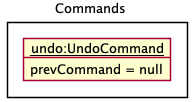
Step 3. The user executes delete 1 to delete the first person in the group.
The delete command will call Model#deletePerson(), making a change to the AddressBook person list once again.
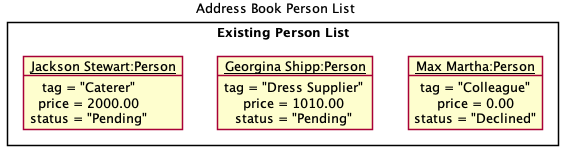
The prevCommand variable will now be assigned to this DeleteCommand object.

Model#setPerson() or
Model#deletePerson(), and the prevCommand value will be set to null.
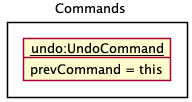
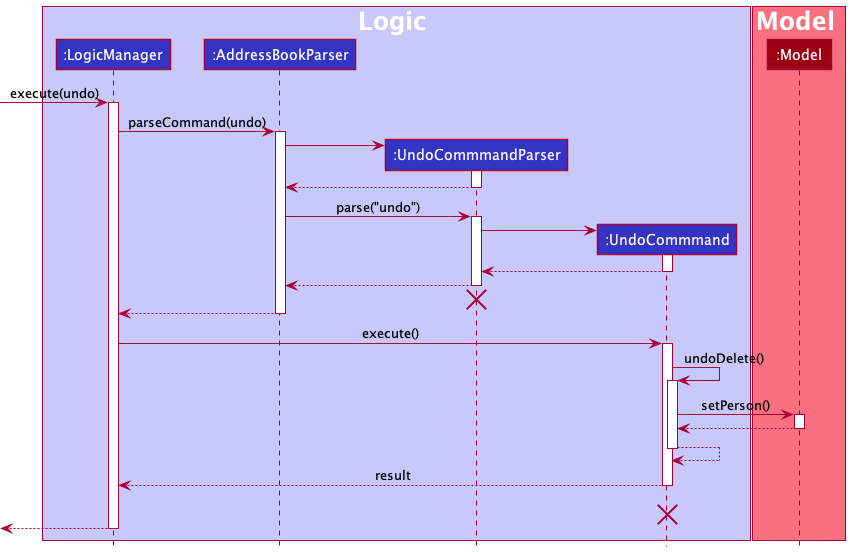
Step 4. The user now decides that deleting the person was a mistake, and decides to undo that action by executing the undo command.
The undo command will call Model#setPerson(), which will revert the AddressBook person list to the
previous state as a result of re-adding the contact at the exact same location.
The prevCommand variable is also updated to equal the UndoCommand object.
The following sequence diagram shows how the undo operation works (for undoing a delete command):
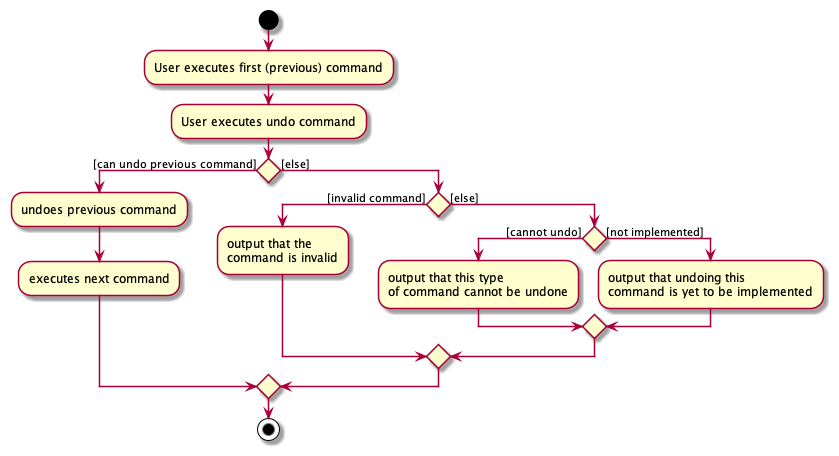
Step 5. The user then decides to execute the command list. Commands that do not modify the AddressBook person list
such as list, will just output a message stating that such a command cannot be undone.
Step 6. The user wants to use undo on the shortcut command, in which case the program will output that undo
has not been implemented for such a command.
The following activity diagram summarizes what happens when a user tries to undo a command:
Design considerations:
Aspect: How undo executes:
-
Alternative 1 (current implementation): Having an undo class to execute the command.
- Pros: Easy to keep track of what the previous command is.
- Cons: as the number of commands increase, the harder it is to keep track of undoing all commands in one place.
-
Alternative 2: Individual command knows how to undo/redo by itself.
- Pros: No need to store several commands’ undoing operations in one class, can have one undo operation (method) for each command.
- Cons: May be harder to keep track of what the previous command is.
-
Alternative 3: Store various states of the AddressBook.
- Pros: Easy to retrieve.
- Cons: Memory issues, when to delete an old (no longer useful) state.
Report on Group feature
Implementation
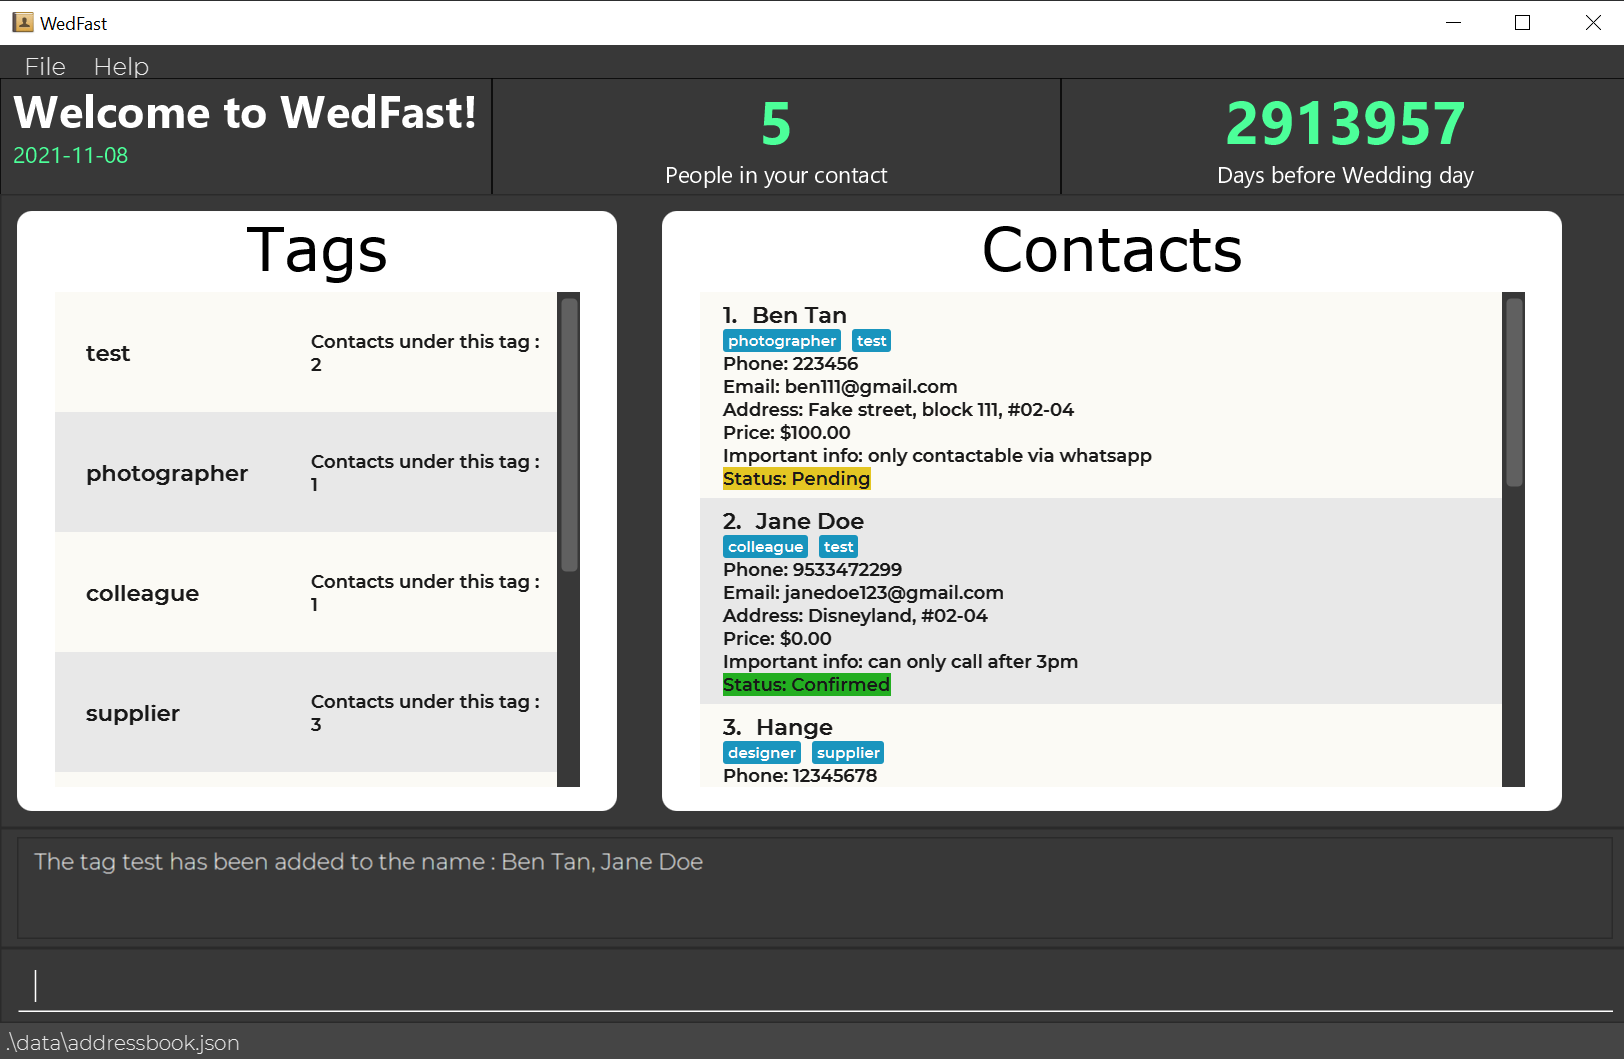
The group mechanism is implemented through the interface command addressbook#getpersonList. The idea is to go through the list of contacts currently recorded in the addressbook, and update the names in the user input by
adding the target tag into each person that is present in the app. In the module, the tagName and the targetNames will be obtained from the inputs. Each name in the targetName that is present in the AddressBook#getPersonList
will receive the specific tag named tagName using the method addTagToContact.
step 1. User execute the command as shown in the diagram
step 2. All userName under targetName will update and get an additional tag.
Design considerations:
Aspect: How group executes:
-
Alternative 1 (current choice): obtain a list of names from the user and edit from the input list
- Pros: Easy to implement, less chance of bugs.
- Cons: User experience depreciates as they need to manually input large volume of text.
-
Alternative 2: group command add tags to all names in the displayed filter list
- Pros: User experience improve the amount of commands needed to input decrease
- Cons: Potential bugs due to increase complexity. User experience may not increase as much as the user may have difficulty trying to get the required filter list using only the commands.
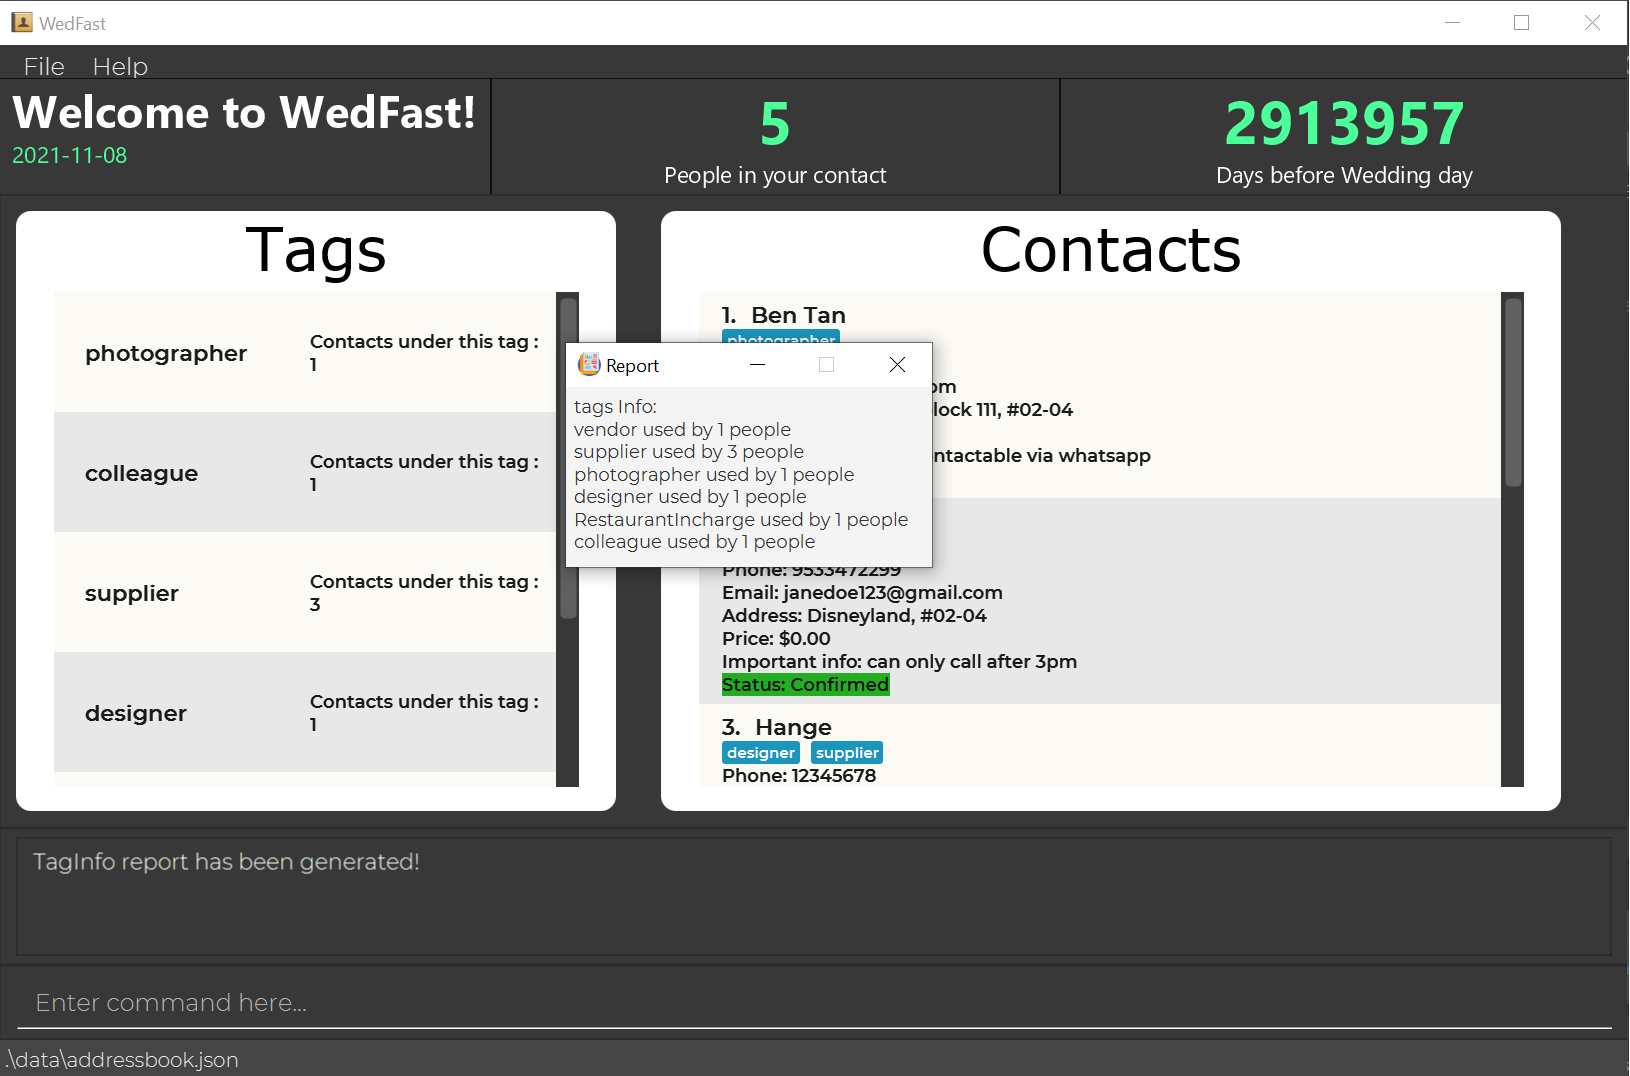
Report on tag information feature
Implementation
The tagInfo mechanism is facilitated by TagInfoCommand. It implements a feature that allows the user to obtain a report for the total number of contacts under each command.
It uses Model#getUniqueTagTable to obtain the number of contacts under the specific tags/
step 1. User execute a specific tagInfo command.
There are two types of command:
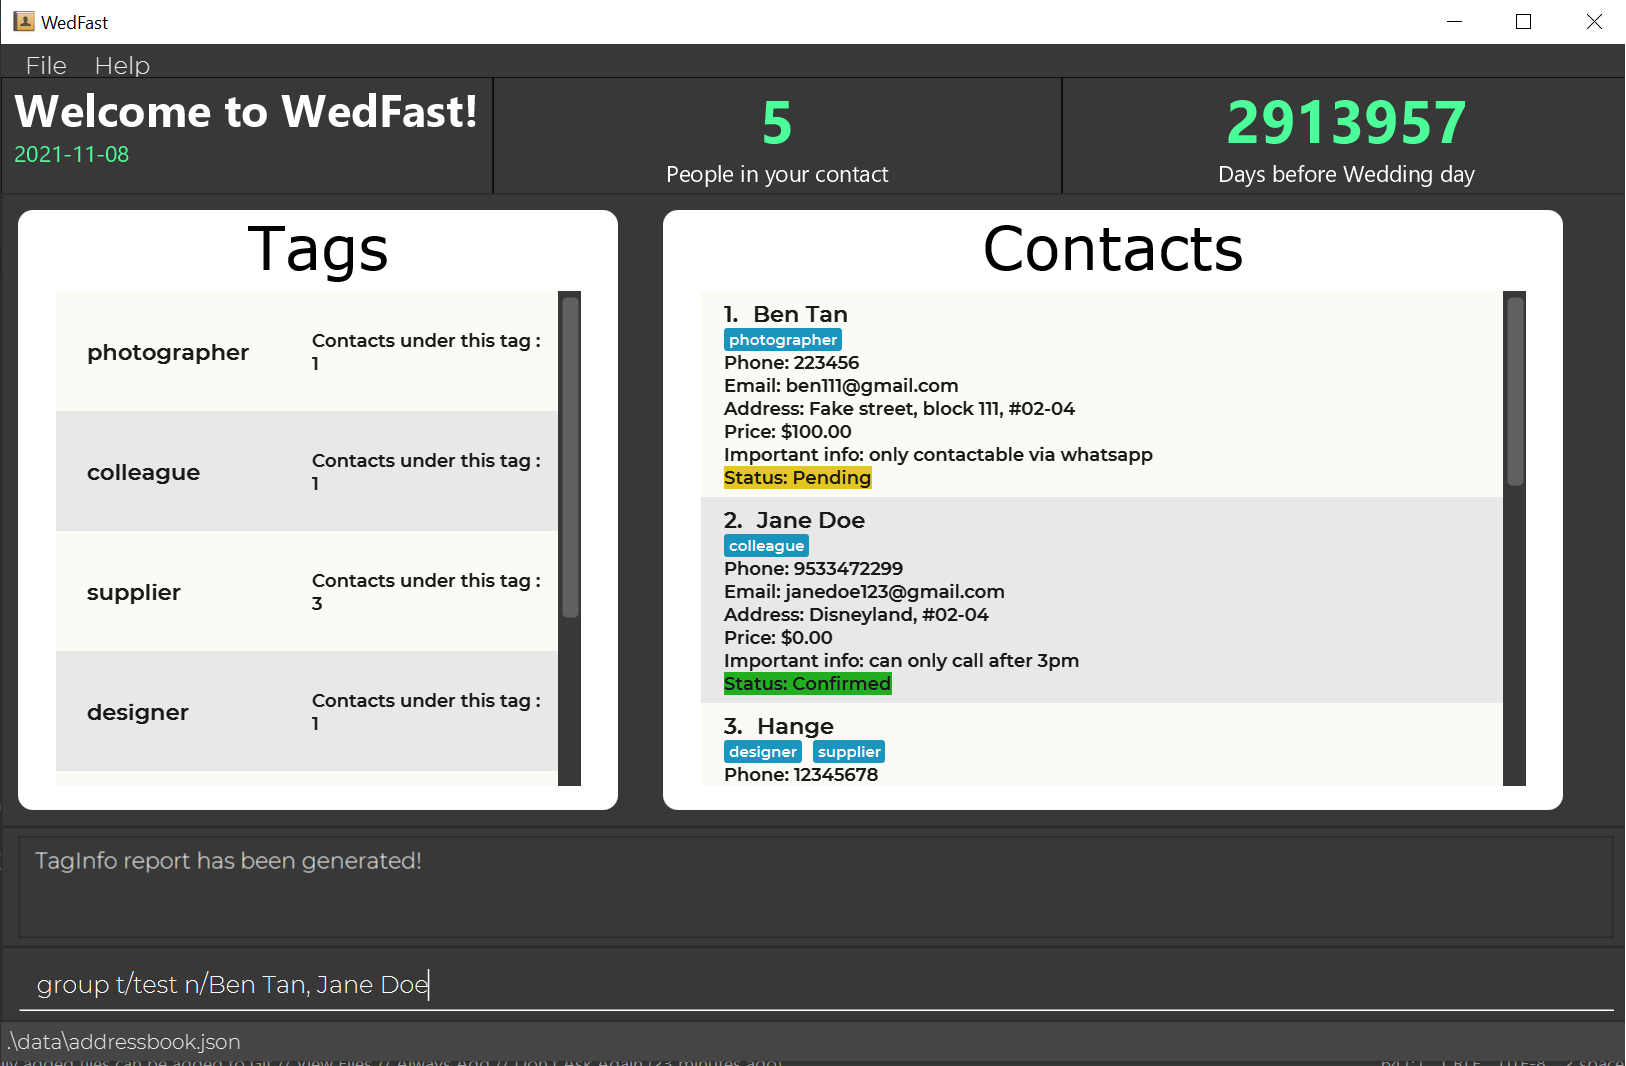
a) Using list as the parameter, as shown in the photo below. This will generate a report that encapsulates all recorded tags in the system.
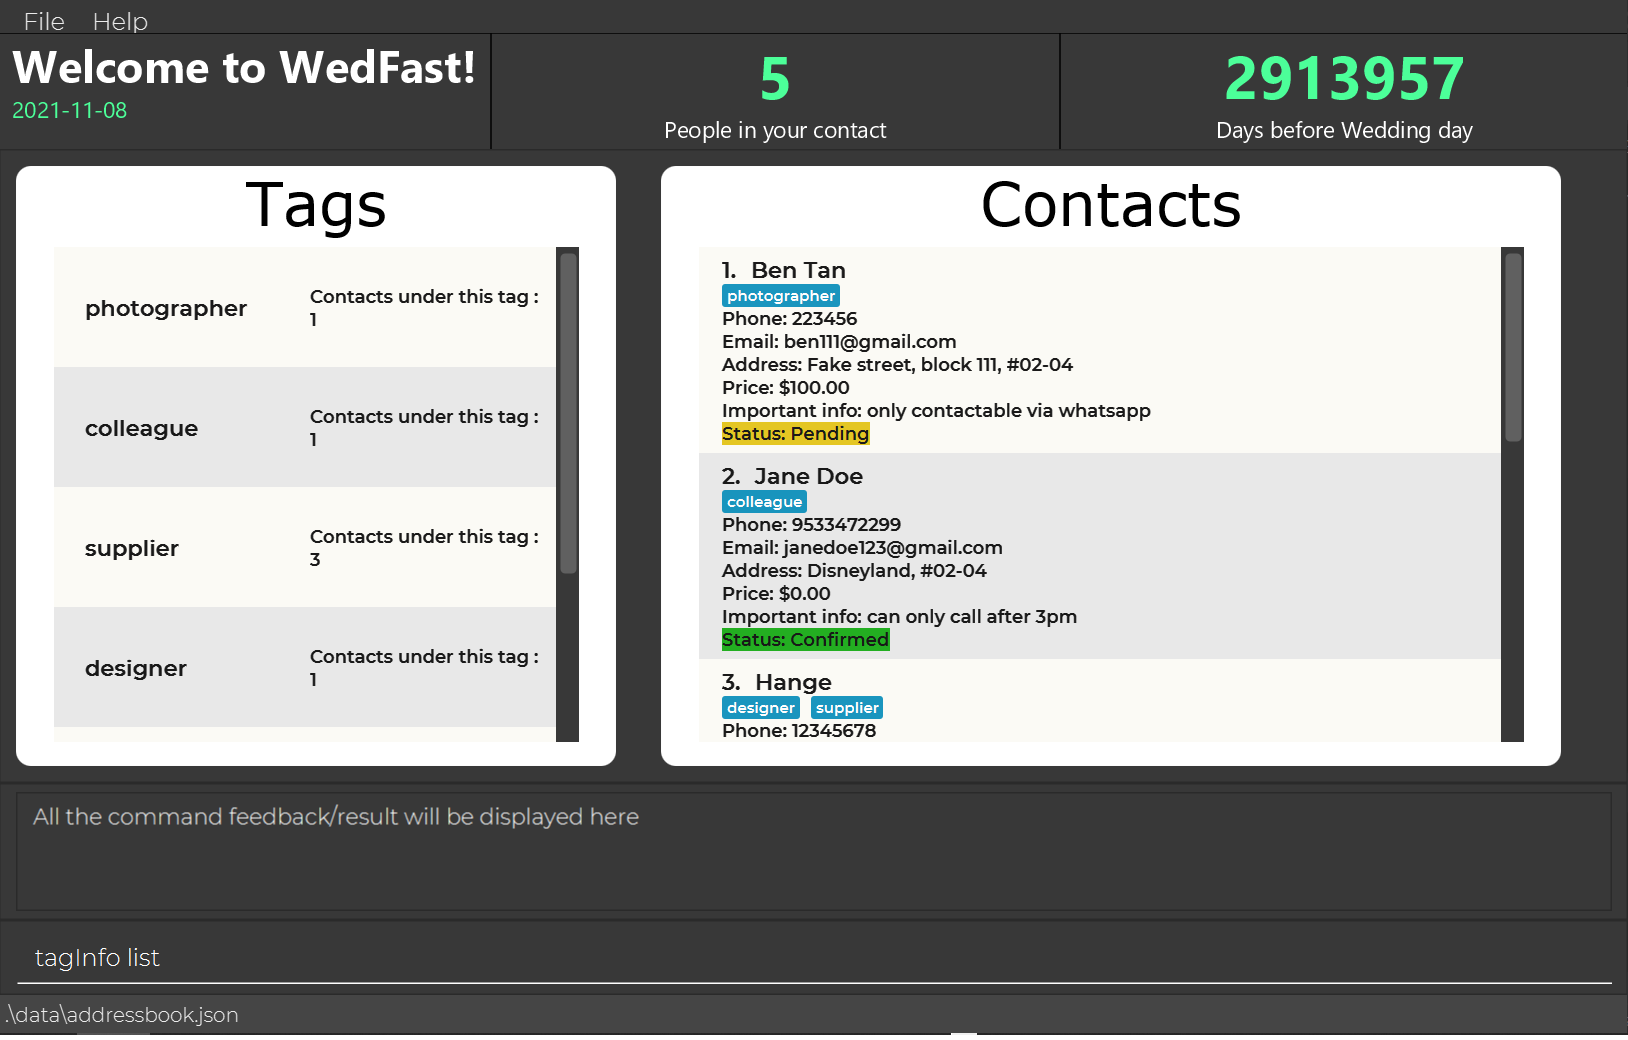
b) Using t/ followed by tagNames... as parameter as shown in the photo below. This will generate a report that contains only the specified tags in the input
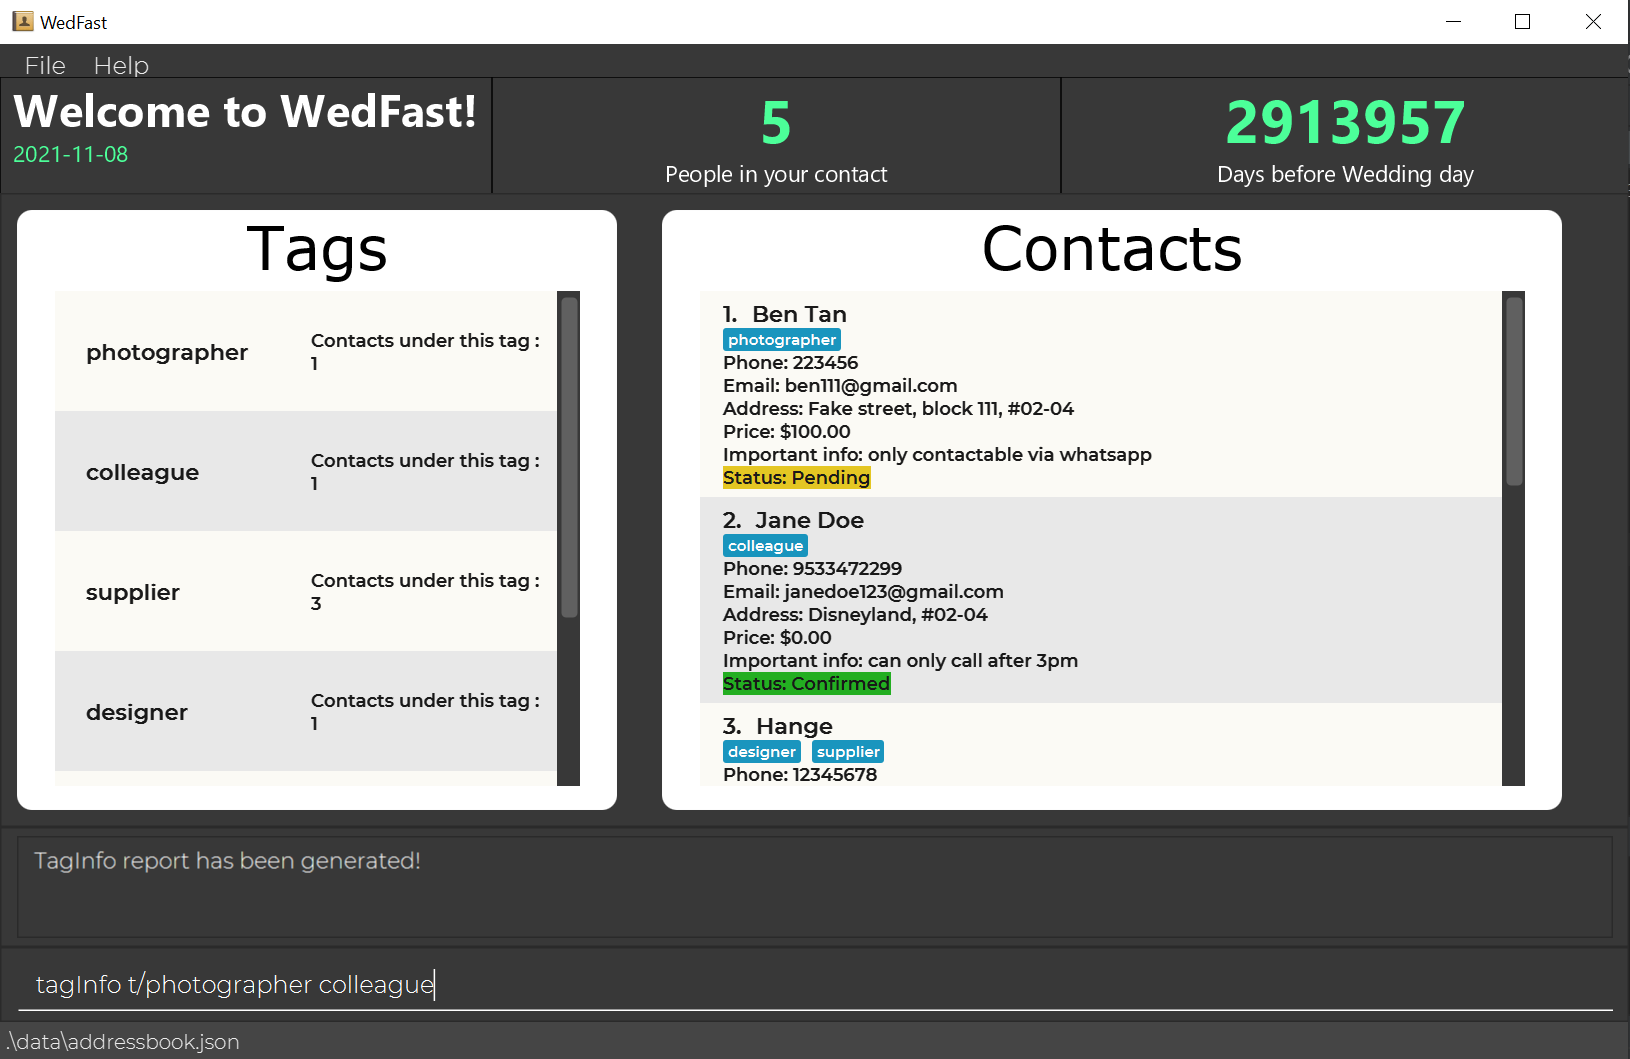
step 2. WebFast will create a reportwindow will contains a report with the total number of contacts for each specified tags in the user input
Design considerations:
Aspect: How tagInfo executes:
-
Alternative 1 (current choice): creates a new hashtable each time the tagInfo command is executed.
- Pros: Easy to implement, less chance of bugs, increase abstraction within the tagInfo command.
- Cons: Increase running time for tagInfo command, could slow down the execution if large number of contacts is present in the app.
-
Alternative 2: Create a global attribute hashtable in the model that is consistently updated based on each command
- Pros: Reduce running time for tagInfo command
- Cons: Increase complexity of the entire app. Very difficult to implement as each command will have to link to an additional global variable. High potential for bugs.
Documentation, logging, testing, configuration, dev-ops
Appendix: Requirements
Product scope
Target user profile:
- plans a wedding for himself/herself
- is required to manage many contacts such as those who are involved/in-charge of the wedding
- prefers desktop applications over other types
- can type fast on keyboards
- prefers typing to mouse interactions
- is reasonably comfortable and prefers using CLI applications
- is often forgetful and needs a program that will assist him with keeping track of the wedding details
Value proposition: manage contacts faster than a typical mouse/GUI driven app and more specific to wedding-planning
User stories
Priorities: High (must have) - * * *, Medium (nice to have) - * *, Low (unlikely to have) - *
| Priority | As a … | I want to … | So that I can… |
|---|---|---|---|
* * * |
new user | access usage instructions | obtain help when I forget how to use the App |
* * * |
user | add a new person | include entries of people I wish to contact |
* * * |
efficient user | delete a person by name | remove an entry that I no longer need without excessive searching |
* * * |
user with changing plans | delete contacts based on their category | remove multiple entries efficiently |
* * * |
user who wants convenience | find a person by name | save time by not searching through the entire contact list |
* * * |
user with several contacts | find contacts using their category | view the contacts I have for each role easily |
* * * |
cost-conscious user | find contacts based on their price range | shortlist affordable services I can contact for hiring |
* * * |
careless user | undo the last incorrect change made to tasks | revert a mistake |
* * * |
expert user | create shortcuts to access different features | utilise the app efficiently |
* * * |
frugal user | add price tags to contacts | avoid exceeding my budget |
* * * |
forgetful user | take note of important information for each contact | avoid missing key details |
* * * |
very organized user | group multiple contacts under the same category | manage the contacts easily |
* * |
user who manages several contacts | view the status of the people involved | check that my plan is consistent |
* * |
forgetful user | check the number of days left till my wedding | schedule tasks left to do well within time |
* * * |
disorganized user | see a summary of the expenses and status of my wedding | better understand the current progress of my wedding |
{More to be added}
Use cases
(For all use cases below, the System is the WedFast and the Actor is the user, unless specified otherwise)
Use case: Add multiple contacts to a group
Guarantees
- Contacts will be added to a group only if both the contacts and group exist.
MSS
- User types out names of the contacts with group name using specified format.
- User confirms.
- System adds contact to said group.
Use case ends.
Extensions
- 2a. Either one of the names/group name is unspecified/blank(white spaces only)/does not exist.
- 2a1. System shows an error message.
Use case resumes at step 1.
- 2a1. System shows an error message.
Use case: Add/Edit price tag
Guarantees:
- A price tag will be added to the contact only if the contact exists and price is specified in the correct format.
MSS
- When adding/editing contact, user also types in the price detail.
- User confirms.
- System updates the contact list and the target contact will now have price tag(s).
Use case ends.
Extensions
- 2a. Price is unspecified/blank(white spaces only)/written in invalid format.
- 2a1. System shows an error message.
Use case resumes at step 1.
- 2a1. System shows an error message.
Use case: Executes a shortcut
Guarantees:
- Shortcut will only be executed if shortcut exists and command is valid.
MSS
- User calls a shortcut
- Command String attached to the shortcut keyword is called
- System runs the command attached at the user story of that command will run
Use case ends.
Extensions
- 1a. Shortcut keyword used does not exist
- 1a1. System shows an error message. Use case resumes at step 1.
- 3a. Shortcut command string is an invalid command
- 3a1. System shows an error message. Use case resumes at step 1.
- 3b. Running the command result in error
- 3b1. System shows the error message of the command Use case resumes at step 1. {More to be added}
Non-Functional Requirements
- Should work on any pc as long as it has Java
11or above installed. - Should be able to store and manage at least 100 contacts.
- Should be able to guarantee data security to protect privacy of user.
- Should not store more than 20 MB of information.
- Program should respond within 2 seconds of each command.
- Product is not handling more than 1 user planning a wedding at once.
- Should be usable by anyone who understands english without any experience in planning weddings.
Glossary
- Mainstream OS: Windows, Linux, Unix, OS-X
- PlantUML: is a tool for specifying various diagrams in a textual form.
- API: The Application Programming Interface specifies the interface through which software and other programs interact
- Private contact detail: A contact detail that is not meant to be shared with others
- Filter: Add tags to contacts such as price, type of contact
- Actor: a role played by a use case
- Keyword: Keyword used to call a shortcut
- Command String: Command attached to the keyword of the shortcut
Appendix: Instructions for manual testing
Given below are instructions to test the app manually.
Launch and shutdown
-
Initial launch
-
Download the jar file and copy into an empty folder
-
Double-click the jar file Expected: Shows the GUI with a set of sample contacts. The window size may not be optimum.
-
-
Saving window preferences
-
Resize the window to an optimum size. Move the window to a different location. Close the window.
-
Re-launch the app by double-clicking the jar file.
Expected: The most recent window size and location is retained.
-
Deleting a person
-
Deleting a person while all persons are being shown
1.1. Prerequisites:
- List all persons using the
listcommand. Multiple persons in the list. - Add a person using the command:
add n/Bryan Tan p/99778866 e/bryantan@hmail.com a/Fake Street. - Make sure there is no person named
DUMMY CONTACT FOR TESTINGin the list.
1.2. Test case:
delete 1
Expected: First contact is deleted from the list. Details of the deleted contact shown in the status message. Timestamp in the status bar is updated.1.3. Test case:
delete 0
Expected: No person is deleted. Error details shown in the status message. Status bar remains the same.1.4. Test case:
delete n/Bryan Tan
Expected: The contactBryan Tanis deleted from the list. Details of the deleted contact shown in the status message. Timestamp in the status bar is updated.1.5. Test case:
delete n/DUMMY CONTACT FOR TESTING
Expected: No person is deleted. Error details shown in the status message. Status bar remains the same.1.6. Other incorrect delete commands to try:
delete,delete n/,delete n/,delete x(where x is larger than the list size)
Expected: Similar to previous. - List all persons using the
Counting down to the wedding day
-
Set the date of the wedding
1.1. Test case:
countdown 2025-04-29
Expected: The wedding date has been set to2025-04-29. The wedding date shown in the status message along with the countdown. Timestamp in the status bar is updated.1.2. Test case:
countdown 29-04-2025
Expected: No wedding date is set. Error details shown in the status message. Status bar remains the same.1.3. Other incorrect set-wedding-countdown command to try:
countdown 2025 April 29,countdown somedummytexthere
Expected: Similar to previous.
Checking expenses of the wedding
-
Checking total cost of the wedding
1.1. Test case:
price
Expected: The total cost of the wedding shown in the status message. Timestamp in the status bar is updated.1.2. Test case:
price somedummytexthere
Expected: Error details shown in the status message. Status bar remains the same. -
Checking total cost for a particular group(tag)
1.1. Prerequisites:
- Learn how to use
editcommand to edit the contact, refer here. - Modify the contact list using
editcommand such that the first and second contact has the following details:- tags:
item1 - price:
$100.00 - status:
Confirmed
- tags:
- Then, modify the rest of the contacts using
editcommand so that all of them have eitherPendingorDeclinedstatus. - Make sure the first and second contact in the list do not have the tag
SOMERANDOMTAGHERE
1.2. Test case:
price t/item1
Expected: The total cost of for the group(tag)itemshown in the status message. Timestamp in the status bar is updated.1.3. Test case:
price t/SOMERANDOMTAGHERE
Expected: Error details shown in the status message. Status bar remains the same.1.4. Other incorrect cost-sum-checking command to try:
price t/
Expected: Similar to previous. - Learn how to use
Deleting a tag
-
Deleting persons with a specific tag
-
Test case:
delete t/testTag
Expected: All contacts with tag, “testTag” are deleted from the list. A success command result stating that contacts under said tag has been removed is shown in the command box. -
Test case:
delete t/unknownTag
Expected: Assuming that person with, “unknownTag” does not exist in the list. Error message stating contacts with such a tag cannot be found is shown in the command box. -
Incorrect delete by tag commands to try:
delete t/
Expected: Error message stating that tag specified must be a non-empty and non-blank string is provided in the command box.
-
Report
-
Showing report consisting of a summary of the statuses and expenses across different tags.
-
Test case:
report
Expected: Report is generated in a pop up window. A command result indicating that the report window has been opened is provided. -
Test case:
report now
Expected: As long as the first word in the command is, “report”, additional words and spaces after the command are ignored. The report is generated in a pop up window. A command result indicating that the report window has been opened is provided. -
Incorrect report command to try:
1 report,reports
Expected: Since both the above commands are invalid, an error message stating that an unknown command has been used is shown in the command box.
-
Undoing information
-
Undoing the previous command
1.1 Test case:
helpinput followed byundo
Expected: outputs to the display section of the program indicating that such a command cannot be undone because it has not changed the contact list information.1.2 Test case:
addsc random c/delete 1input followed byundo
Expected: outputs a message stating that undo has not been implemented for this feature. Contact list remains the same.1.3 Test case: passes in a null object to the previous command before inputting
undo(this mimicks what happens when an invalid input is used).
Expected: prints in the program that the previous command was invalid, hence undo does not work.1.4 Test case:
delete 1input followed byundo
Expected: deleting the first person in the list has been undone with a message indicating the task was successful. Surrounded by a try-catch for the case that the contact list is empty
Shortcut features
-
Add a new shortcut
1.1. Test case:
addsc s c/list
Expected:listscnow showsKEY s - COMMAND list. Callingsc swill list out all the contacts1.2. Test case:
addsc c/list
Expected: Error message. Invalid command format.1.3. Other incorrect add-shortcut command to try:
addsc s
Expected: Same as 1.2 -
Using a shortcut
2.1. Prerequisites:
- Add a shortcut using
addsccommand such as the one above (keyword:s, command:list) - Make sure the shortcut is shown in
listsc
2.2. Test case:
sc s
Expected: Lists out all items the exact same as thelistcommand. Otherwise, functions as specified by the command string.2.3. Test case:
sc
Expected: Incorrect format. Invalid command format error shown.2.4. Calling command that does not exist:
sc a
Expected: Command not found eror shown - Add a shortcut using
-
Deleting a shortcut
3.1. Prerequisites:
- Add a shortcut using
addsccommand such as the one above (keyword:s, command:list) - Make sure the shortcut is shown in
listsc
3.2. Test case:
removesc s
Expected: Displays message that shortcut was removed successfully.listscwill no longer show that contact3.3. Test case:
removesc
Expected: Incorrect format. Invalid command format error shown.3.4. Calling command that does not exist:
removesc a
Expected: Command not found eror shown - Add a shortcut using
-
Viewing shortcuts
4.1. Prerequisites:
- Add a shortcut using
addsccommand such as the one above (keyword:s, command:list)
4.2. Test case:
listsc
Expected: Displays all correct shortcuts added by the user. - Add a shortcut using
Finding Contacts
-
Finding contacts from their names, tags, and price
1.1. Prerequisites:
- List all persons using the
listcommand. Multiple persons in the list. - Add a person using the command:
add n/Bryan Tan p/99778866 e/bryantan@hmail.com a/Fake Street t/Tag pr/20.00. - Add a person using the command:
add n/Sam p/99887766 e/samn@hmail.com a/Fake Street t/Tag Tag2 pr/10.00. - Make sure there is no person named
DUMMY CONTACT FOR TESTINGin the list.
1.2. Test case:
find Bryan
Expected: Bryan Tan and other existing contacts named Bryan is shown.1.3. Test case:
find t/Tag
Expected: Both Bryan and Sam is shown as they both have the tag “Tag”.1.4. Test case:
find Bryan Sam
Expected: Both Bryan and Sam is shown by searching for their names1.5. Test case:
find pr/=10.00
Expected: Only Sam is shown as his price is 10.00.1.6. Test case:
find pr/>10.00
Expected: Only Bryan is shown as his price is 20.00.1.7. Test case:
find pr/<20.00
Expected: Only Sam is shown as his price is 10.00.1.8. Test case:
find pr/<=20.00
Expected: Both Bryan and Sam is shown as their prices are lower than or equal to 20.00.1.9. Test case:
find pr/>=10.00
Expected: Both Bryan and Sam is shown as their prices are higher than or equal to 10.00.1.10. Test case for invalid find:
find,find t/
Expected: Error message shown. Invalid command format.1.11. Test case for invalid price:
find pr/1,find pr/=a
Expected: Error message shown. Invalid price format. - List all persons using the
Saving data
-
Dealing with missing/corrupted data files
- Simulating a corrupted file:
- In the app’s home folder, look for a folder named
data, double click into it, then look for a file namedcountdown.json. - If the file is not found, launches your app and type the command:
countdown. - Open the file and modify the
monthtoTESTof the countdown as shown below, then save it: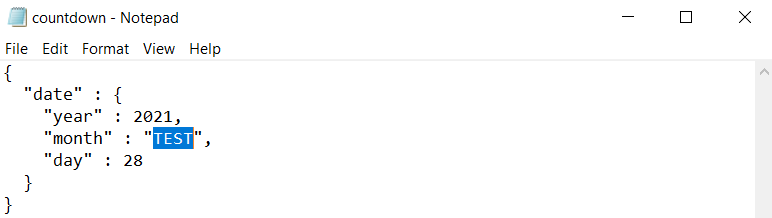
- If your app is open now, close it.
- In the app’s home folder, look for a folder named
- Expected behavior:
- Relaunches the app and you will see the following displayed in the status message. It means the original corrupted
countdown.jsonwill be replaced with the new one the next timecountdowncommand is used. Timestamp in the status bar is updated.
- Use
countdowncommand, then reopen thecountdown.json. You will see themonthhas been changed to today’s month.
- Relaunches the app and you will see the following displayed in the status message. It means the original corrupted
- Simulating a corrupted file:
Effort
-
Difficulty level:
- This project has the medium high level of difficulty as all of our developers has to handle this project in the time of pandemic. It means that all of us have to work from home, thus making the communication harder and reduce the productivity.
- Furthermore, all of us has no prior experience of handling brown field project, and has very little experience in using JavaFX. Most of the tools used are learnt on the spot and apply directly to the project.
- Last but not least, this project has a very tight time constraint.
-
Challenges faced:
- Difficulty in communication: All discussions are through Zoom(a software used for online meeting) comes with the risk of slow internet connection and issue in microphone.
- Responsibilities outside the project: Most of us has other responsibilities to deal with, limiting us from dedicating more time for this project.
-
Effort required:
- Coordinating with all the developers’ schedule.
- Learn the convention of writing a proper documentation.
- Learn the tools such as JavaFX from scratch and apply directly.
-
Achievements of the project:
- All the deliverables for each milestone has been submitted on time.
- All the bug detected has been solved on time.
- Ultimately, this project has been quite challenging as our solution architecture involves the contacts with more entities type than the original AB3 project.
The additional entities involved includes
price,important info, andstatus. These serves as the foundation for some features implemented and requires extra time and effort to modify the existing feature to ensure the app functions as expected.